SUNDAY, AUGUST 9, 2026
15 TOPICS

HLD System Design Notes

High-Level Architecture & Distributed Systems Worth Your Time


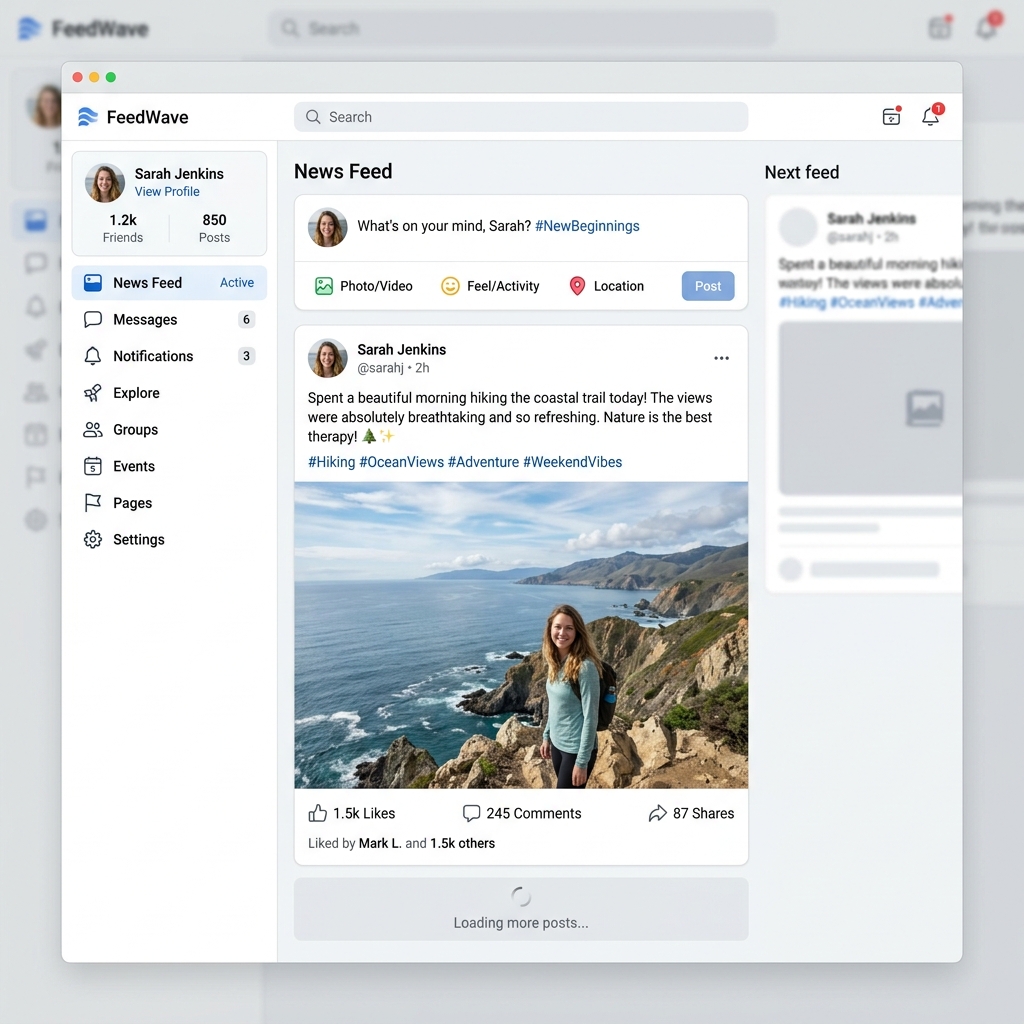
News Feed Application UI Wireframe


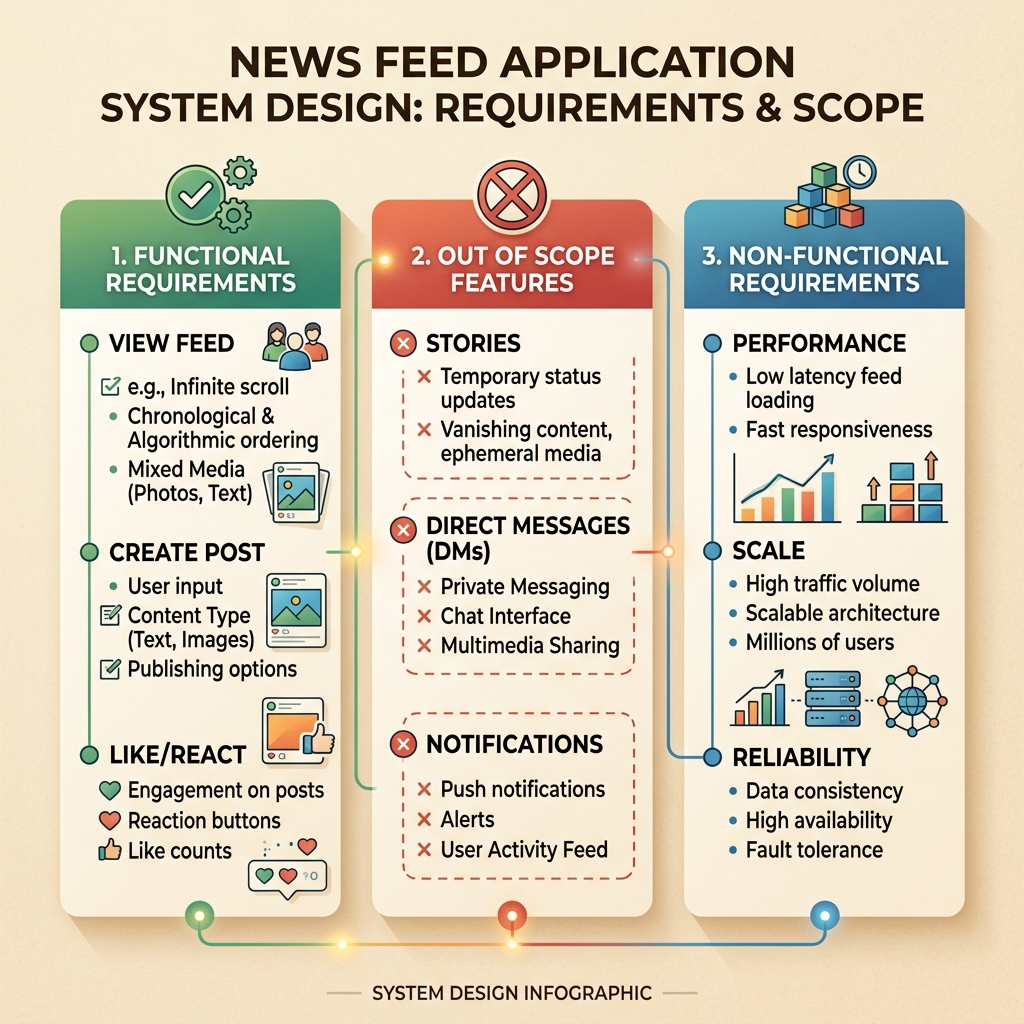
Lesson 1: News Feed — Phase 1: Requirements & System Scope

News Feed Requirements & System Scope Overview


2. 🗣️ Interview Opening Script (Verbal Pitch to Interviewer)

Practice speaking this exact script out loud to open your System Design interview with confidence:

“Sure — before I jump into the design, let me just quickly nail down the scope with you, since ‘news feed’ can honestly mean a lot of different things depending on the product.

So I’ll assume we’re mainly talking about the core experience — a user opening the app, scrolling through a feed of posts from people they follow, being able to create a post themselves, like or react to posts, and leave comments. And obviously, as they scroll, more posts should keep loading in.

I’ll leave out things like stories, DMs, notifications, or search for now — happy to touch on those later if you want, but I don’t think they’re the core of this problem.

And then just thinking about scale for a second — I’ll assume this is for a pretty large user base, so performance actually matters here. I want the feed to feel fast, ideally loading in a second or two, and I want it to stay usable even if the network’s a bit weak, like on mobile. It also doesn’t need to be perfectly real-time — if a new post takes a few seconds to show up, that’s fine, but the whole thing should feel reliable, not break if something fails in the background.

Does that sound like a reasonable scope to start with, or is there something specific you want me to focus more on?”


💡 Quick Reference: Functional vs Non-Functional

Functional Requirement = A Feature (What the app does)
Example: “User can comment on a post”

Non-Functional Requirement = A Quality Metric (How well the app behaves)
Example: “Feed renders smoothly at 60fps on a low-end mobile device over a 3G network”

Lesson 2: News Feed — Frontend Component Architecture

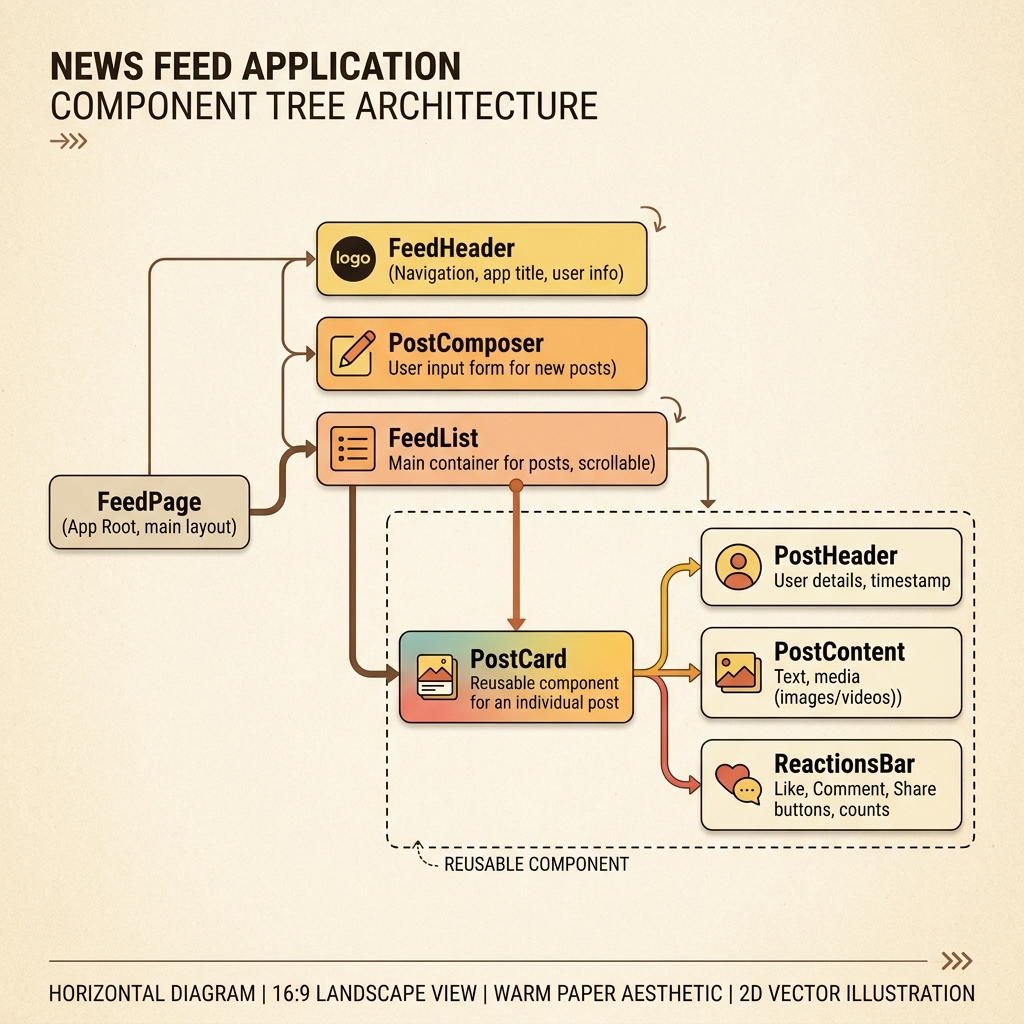
News Feed Component Tree Architecture Diagram


1. Key Architectural Principle

🔑 “Write once, reuse everywhere. Fix once, fixed everywhere.”

Practical Engineering Example:

If the product team requests: “Make the Like button bigger and change its color to Crimson”:

  • With Component Architecture: You edit ReactionBar.jsx one time, and every single post across the entire app updates instantly.
  • Without Component Architecture: You would have to hunt down and copy-paste changes across hundreds of separate code blocks.

2. 🗣️ Interview Opening Script (Verbal Pitch to Interviewer)

Practice speaking this exact script out loud during your System Design interview:

“For the frontend, I’d break the feed screen down into a few main pieces rather than building it as one big component.

At the top, I’d have a FeedPage, which is basically the container for the whole screen. Inside that, I’d have a FeedHeader for things like the logo or feed tabs, a PostComposer where the user can write a new post, and then a FeedList, which is responsible for rendering the actual scrollable list of posts.

Now, instead of writing separate code for every single post, I’d have one reusable PostCard component, and just feed it different post data each time it’s rendered — so the exact same component gets reused for every post in the feed.

And then inside PostCard, I’d break it down even further — a PostHeader for who posted it and when, PostContent for the actual text or image, and a ReactionBar for the like and comment buttons.

The main benefit of structuring it this way is that each piece has one clear responsibility, and if something needs to change — like the design of the like button — I only need to update it in one place, and it reflects everywhere it’s used.”


❓ Next Lesson: Data Fetching & State Ownership

Upcoming Architecture Question:
Who should be responsible for FETCHING post data from the server?

  • FeedPage?
  • FeedList?
  • Or each individual PostCard?

(Covered in Lesson 3: State Ownership & Data Fetching Models)

Lesson 3: News Feed — Phase 3: State Ownership & Data Fetching
News Feed State Ownership & Data Fetching Architecture


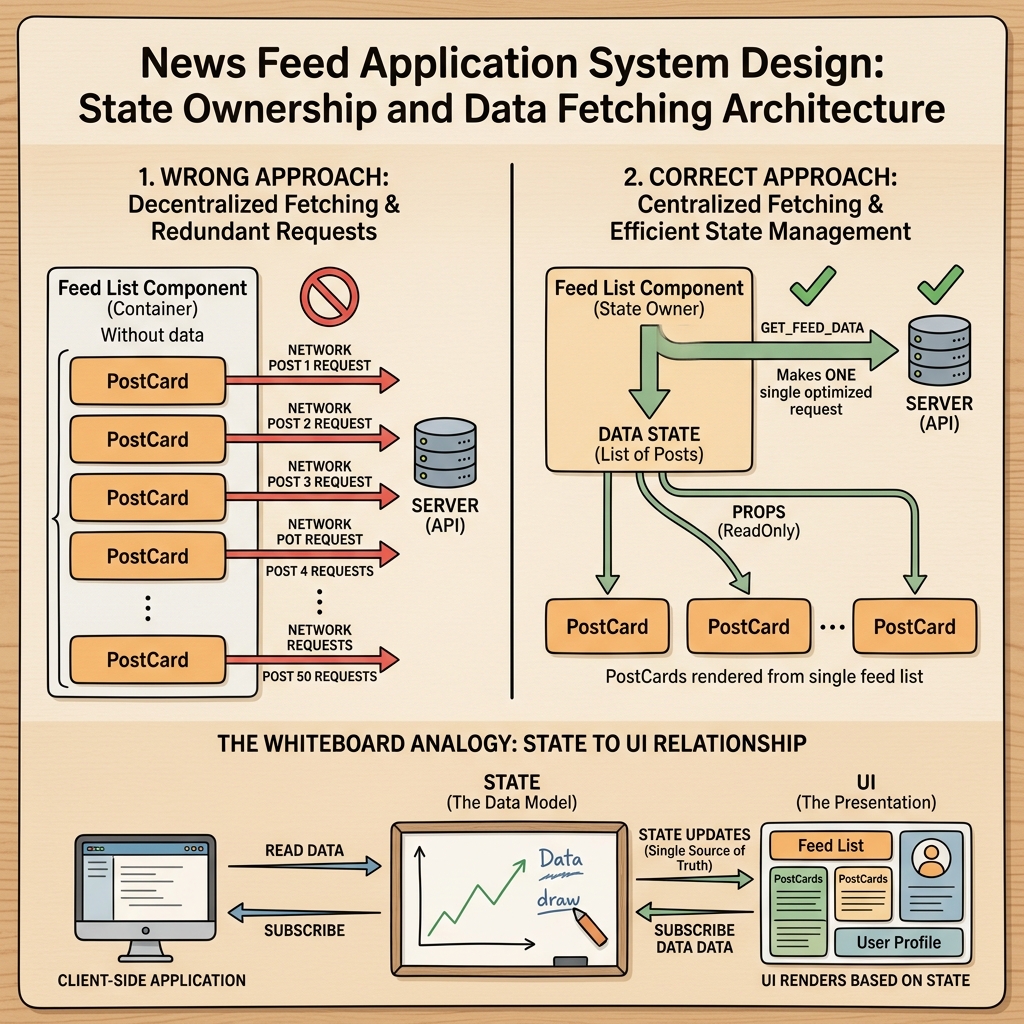
1. Key Architectural Rule

🔑 “Fetch data as close as possible to where it’s needed, but NOT so low in the tree that it duplicates requests.”

  • PostCard → ❌ WRONG (Firing 50 HTTP requests for 50 posts)
  • FeedList → ✅ RIGHT (Fetching ONCE and passing props down)
  • FeedPage → ℹ️ LAYOUT ONLY (Keeps top-level container simple & decoupled)

2. 3a. Prop Drilling (Data Flow Down the Tree)
Prop Drilling Architecture

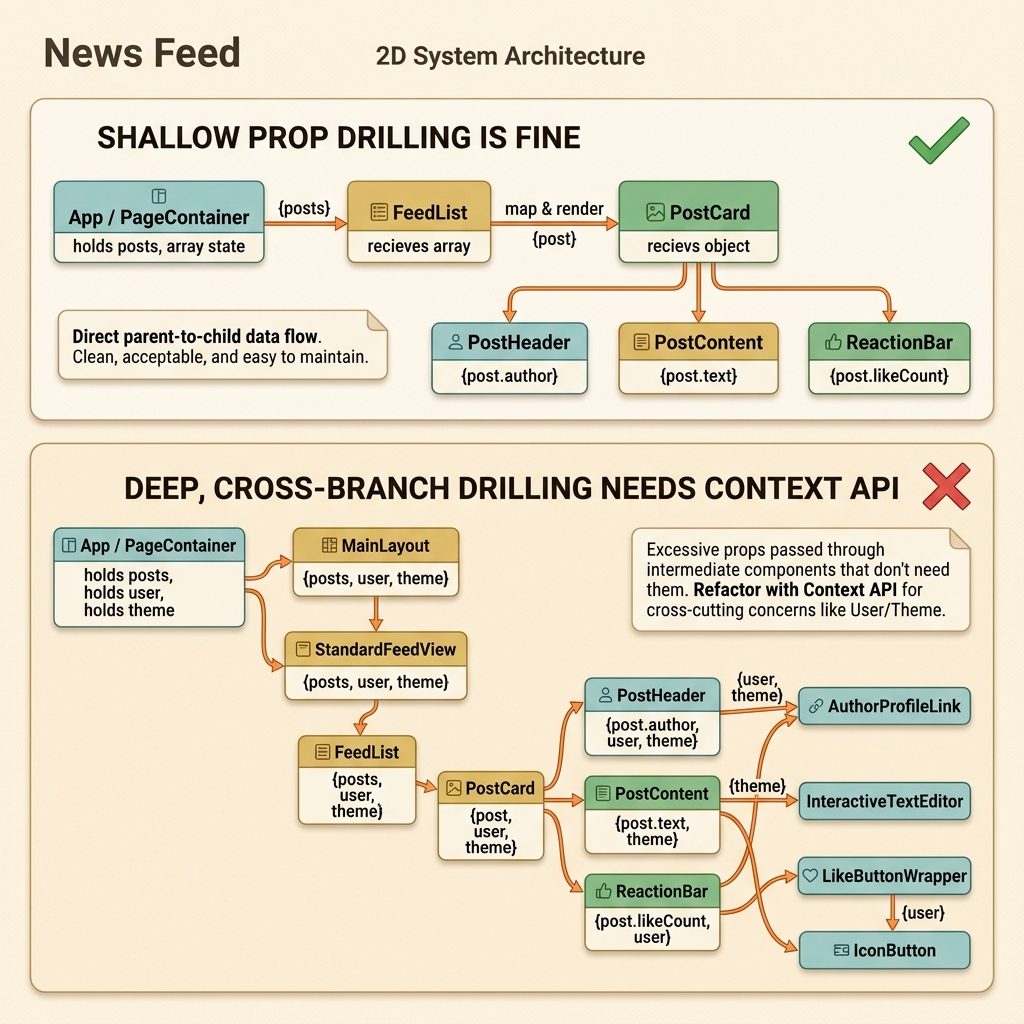
“Right, so once FeedList has the array of posts, it just loops through them and passes each individual post down to PostCard as a prop.

Now, inside PostCard, that post data needs to reach smaller children too — like PostHeader needs the author info, and ReactionBar needs the like count. So PostCard just passes the relevant slice of that data further down as props to its own children.

This pattern — passing data down through multiple layers just so a deeply nested component can use it — is called prop drilling. It’s totally fine for a shallow tree like this one, two or three levels deep, it’s simple and explicit.

Where it becomes a problem is if the tree gets much deeper, or if many unrelated components in different branches all need the same piece of data — then you’re threading the same prop through five or six components that don’t actually care about it themselves, just to hand it further down. At that point, I’d reach for something like Context, or a state management library, instead of prop drilling.

But for this feed structure specifically — FeedList to PostCard to ReactionBar — it’s only two levels deep, so plain prop drilling is the right call. I wouldn’t reach for Context here just because it’s ‘more advanced’; that would be over-engineering something simple.”


3. 3b. 4 Types of State (UI vs Server vs URL vs Persistent)
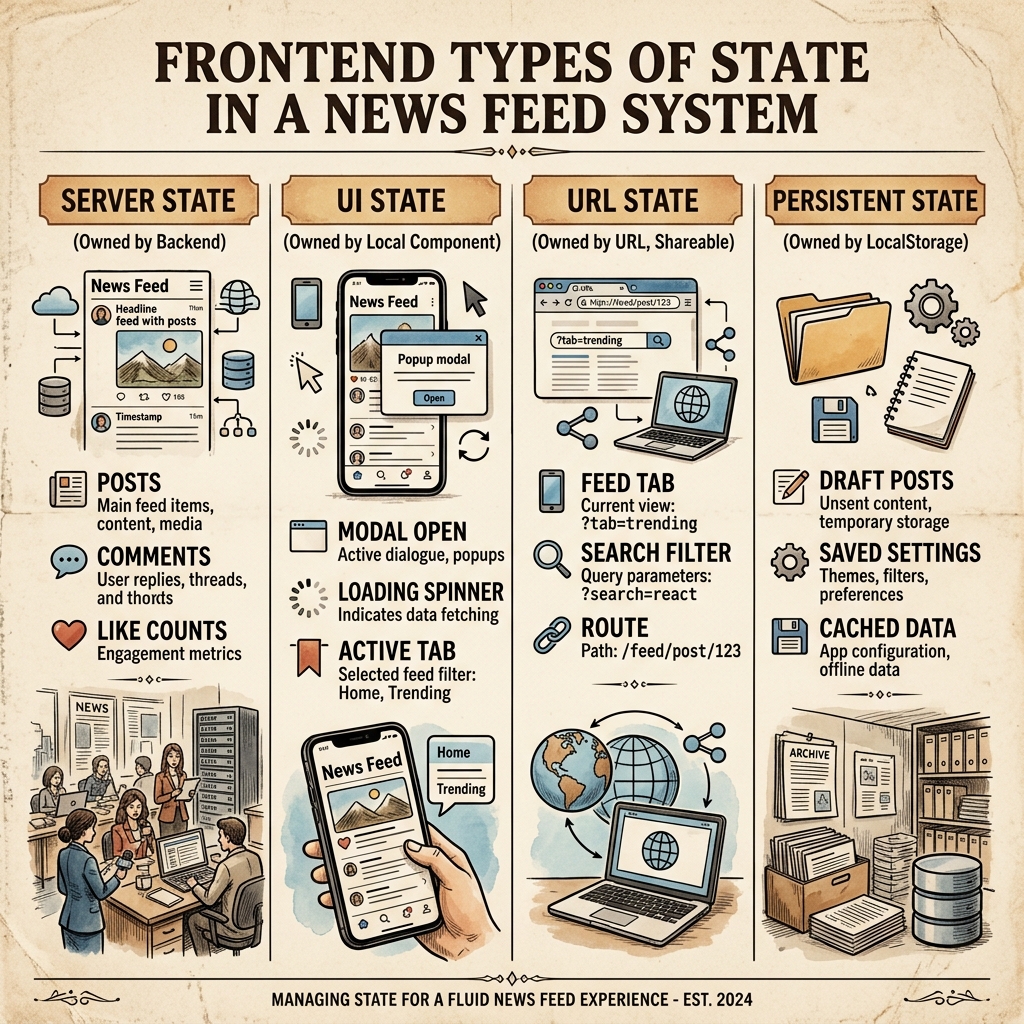
Types of State Infographic

“No, actually I’d break state into a few different categories, because each one behaves differently and I’d manage them differently.

First, there’s Server State — this is data that actually lives on the backend, like the list of posts, comments, like counts. The frontend doesn’t own this data, it just fetches a copy of it and keeps it in sync. This is exactly what we just talked about with FeedList fetching posts.

Then there’s UI State — this is purely local, presentation-level stuff that has nothing to do with the server. Things like whether a modal is open, which tab is currently active, or whether a ‘like’ button is mid-animation. This typically lives right inside the component that needs it, and doesn’t need to be shared globally.

Then there’s URL State — state that actually lives in the URL itself, like which feed tab you’re on, or a search filter. I like putting this in the URL when it makes sense, because it means the page is shareable and bookmarkable, and refreshing the page doesn’t lose that context.

And finally, there’s Persistent State — things like a draft post the user was writing, or saved preferences, that I’d want to survive even if they close the tab or refresh. That usually goes into something like local storage.

The reason I separate these is that mixing them up causes real problems — for example, if I treated server data like local UI state, I’d end up manually managing sync, refetching, and staleness myself, when a proper data-fetching layer is built to handle exactly that. So for the feed specifically: posts and comments are server state, whether the composer box is expanded is UI state, and the active feed tab — Following vs For You — I’d actually put in the URL.”


4. 3c. Like-State Ownership & Updating
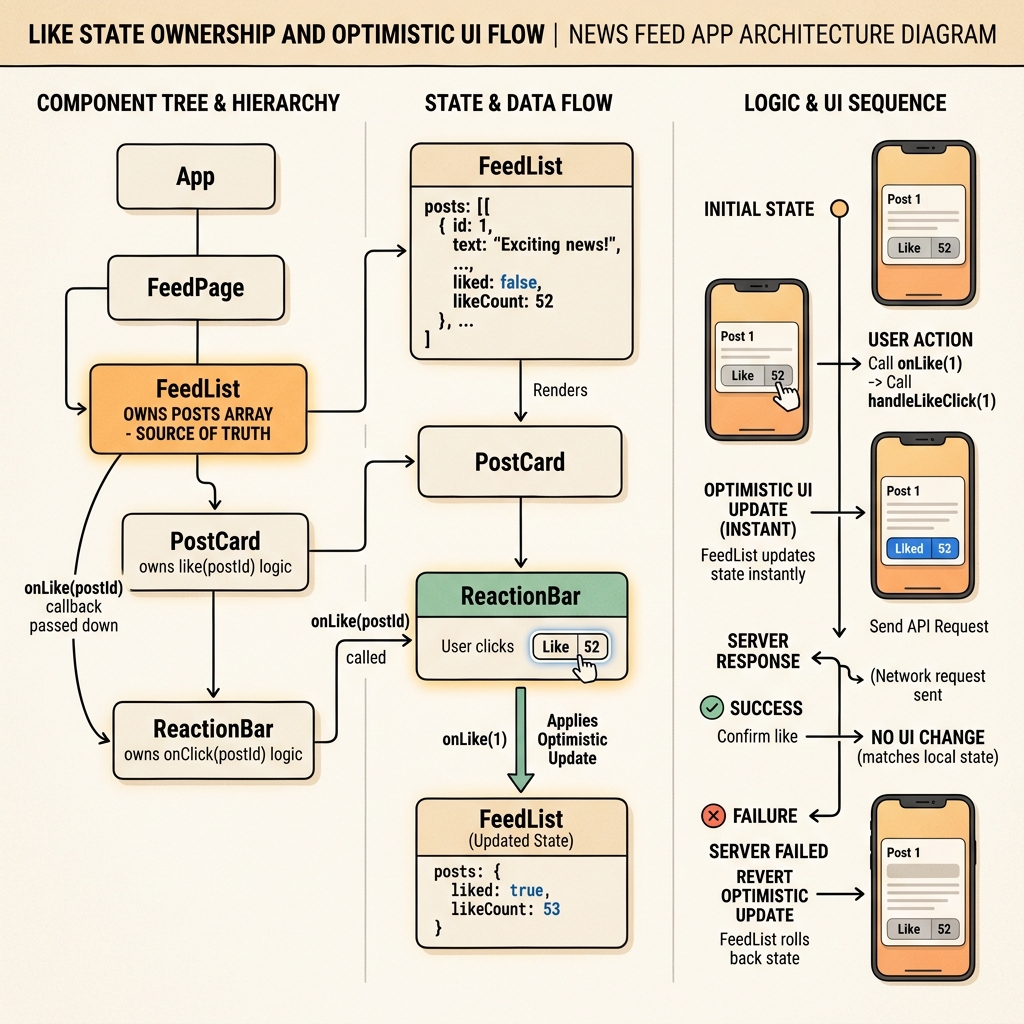
Like State Ownership Architecture

🔑 “Update state at the level where it’s OWNED, not at the level where it’s DISPLAYED.”

  • ReactionBar → Displays the like count (does NOT own it)
  • FeedList → Owns the like count array (Single Source of Truth)

“So the like count is part of the post data, and we already said posts live as server state up at the FeedList level — that’s the single source of truth for all the post data. The ReactionBar, where the actual like button lives, is several levels deep — it doesn’t own that data itself, it just received it as a prop.

So when the user clicks like, I wouldn’t just update some local state inside ReactionBar in isolation — because if I did that, and the parent list re-renders or that post appears somewhere else on the page, the like count could get out of sync. Instead, the click needs to trigger an update at the source of truth — the posts array up in FeedList — and specifically just that one post inside it, not the whole list.

Practically, that means ReactionBar doesn’t hold its own like-count state — it just calls a function, something like onLike(postId), which gets passed down to it. That function actually updates the specific post’s like count in the shared posts data. Once that updates, React re-renders, and the new count flows back down through the same path — FeedList to PostCard to ReactionBar — automatically.

The key idea I’m applying here is: update state at the level where it’s owned, not at the level where it’s displayed. ReactionBar displays the like count, but it doesn’t own it — FeedList owns it. If I let a deeply nested component silently manage its own copy of shared data, I’d end up with inconsistent state across the app.

Now, one more thing worth mentioning — in practice, I wouldn’t want the user to wait for a server response before seeing the like count change, since that would feel sluggish. So I’d actually update the UI immediately, before the server even confirms it, and roll it back if the request fails. That’s a pattern called Optimistic UI, which I can go into more detail on if useful.”


🎯 5. Interview Technique Tip: “Contrast & Land”

💡 The “Contrast & Land” Pattern:
State the WRONG option firstExplain WHY it’s wrongLand on the RIGHT answer.
Why interviewers love this: It proves architectural trade-off reasoning rather than memorization.


❓ Phase 3 Complete & Next Steps

Phase 3 Summary: Complete masterclass on Data Fetching Responsibility, Prop Drilling, 4 State Categories, and Like-State Mutability.
Next Phase: Phase 4: Frontend / Backend Boundary & API Contract Design
Lesson 4: News Feed — Phase 4: Frontend / Backend Boundary

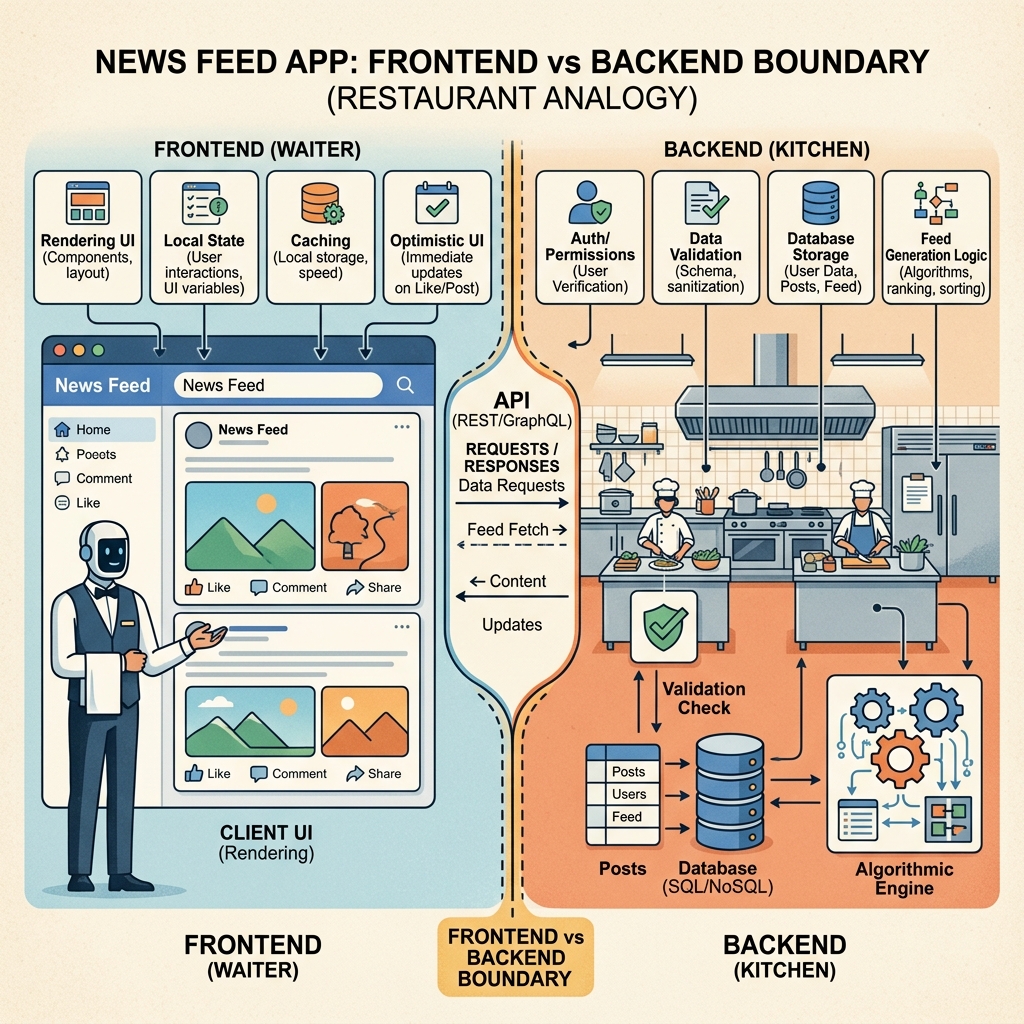
Frontend vs Backend Boundary Architecture


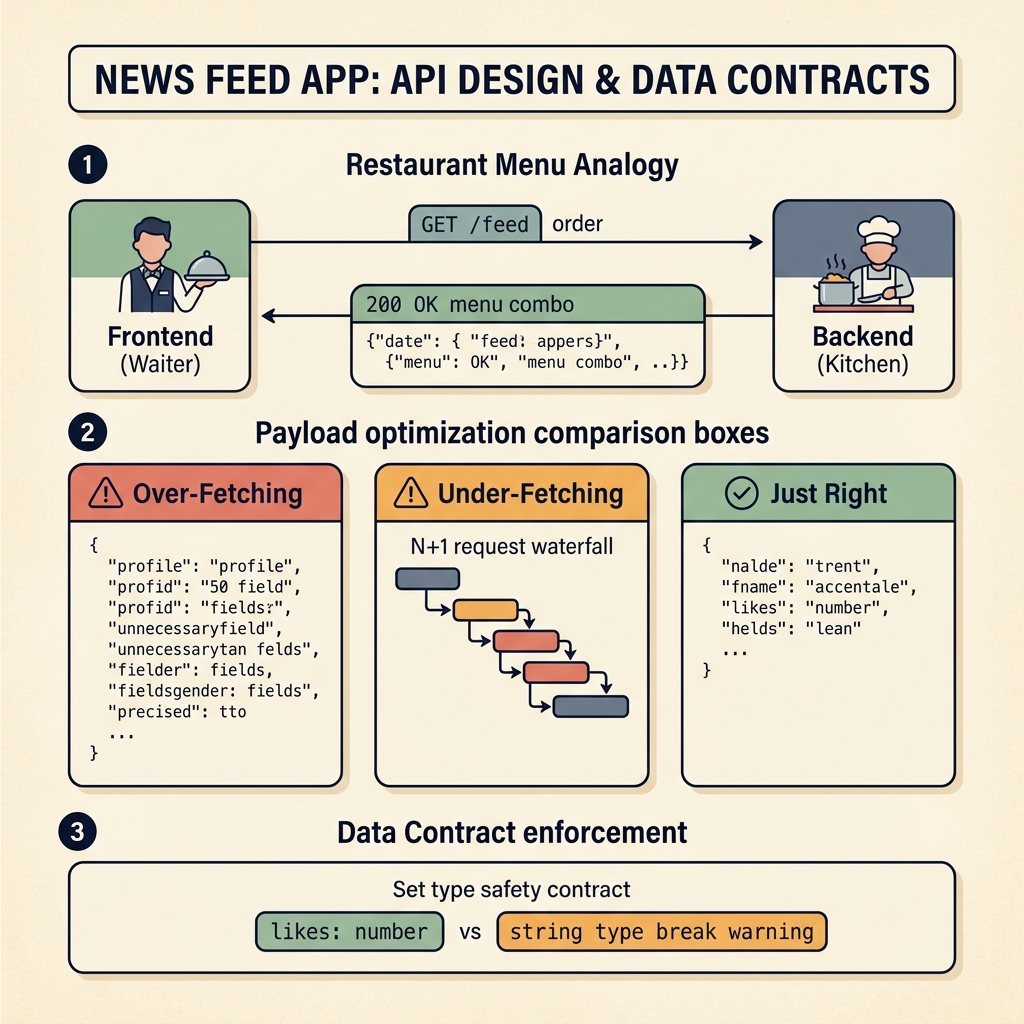
1. The Core Boundary Idea: Restaurant Analogy

LayerAnalogyResponsibilities
Frontend (User’s Device)The WaiterTakes orders, presents UI nicely, client caching, local UI state, routing. Does NOT control stock or rules.
Backend (Server Infrastructure)The KitchenHolds real database data, validates payload rules, enforces permissions, generates feed ordering. Has FINAL SAY.

2. The Golden Security Rule

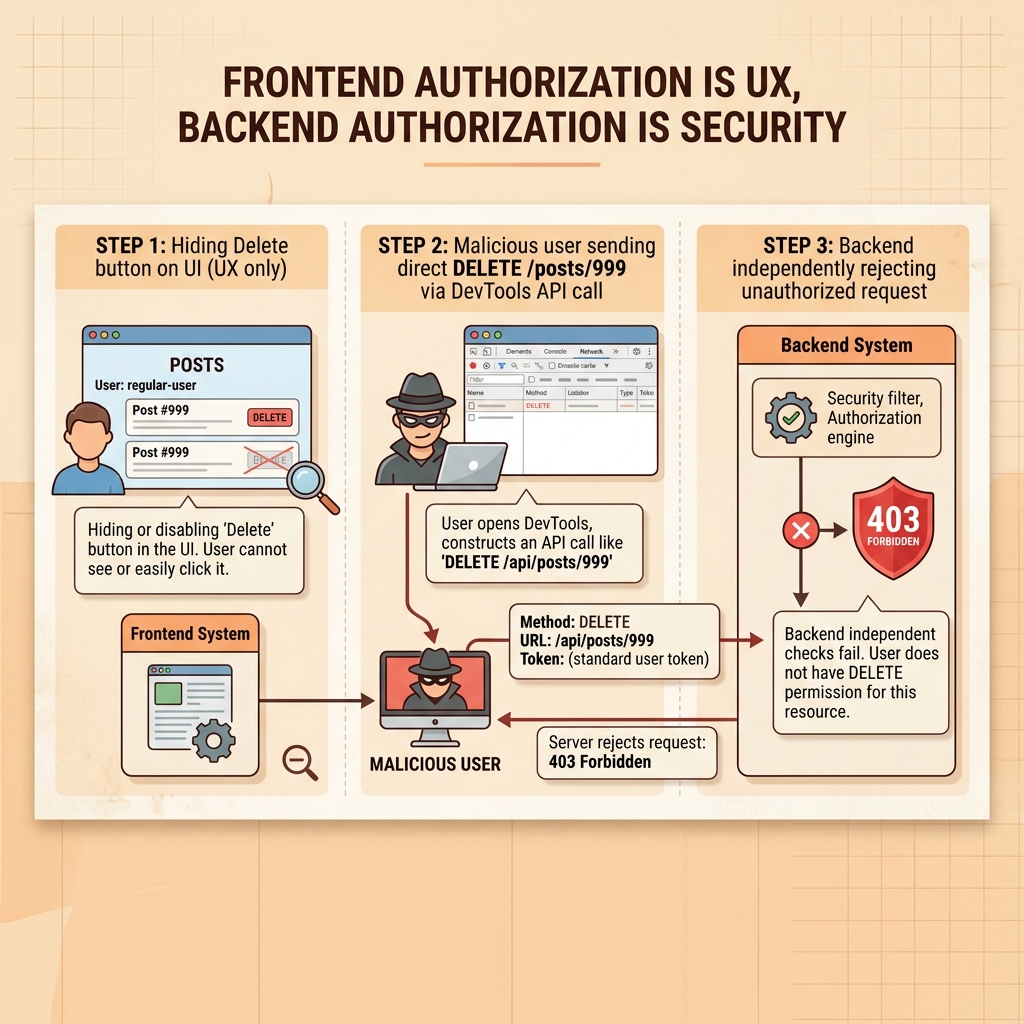
Frontend Authorization is UX, Backend Authorization is Security

🔑 “Frontend authorization is UX. Backend authorization is security.”

Why Hiding a Button is NOT Security:

  1. Step 1: Frontend hides “Delete” button on posts that aren’t yours (Looks safe in UI).
  2. Step 2: A malicious user opens DevTools or Postman.
  3. Step 3: They bypass the UI entirely and send: DELETE /posts/999 directly to the API.
  4. Step 4: If the backend does NOT independently verify ownership and reject the request, the delete succeeds anyway!

⚠️ Metaphor:
Hiding the button = Locking the front door.
Unprotected API Endpoint = Leaving the back window wide open.

GoalLayer ResponsibleArchitectural Impact
🛡️ SECURITYBackend’s Job (Non-Negotiable)Does the HTTP request actually succeed or get rejected?
🎨 USER EXPERIENCEFrontend’s Job (Nice-to-Have)Does the user see a smooth, sensible interface without broken buttons?

3. 🗣️ Interview Script — Frontend / Backend Boundary

Practice speaking this exact script out loud during your System Design interview:

“Yeah, so I try to keep this line pretty clear in my head. Basically — anything about how things look and feel is frontend’s job. Rendering the feed, handling scroll, showing loading spinners, caching stuff locally, making the UI feel snappy with optimistic updates — that’s all frontend.

The backend, on the other hand, owns anything that’s actually real — like, who’s allowed to do what, what data actually exists, what gets stored, and what posts should even show up in your feed in the first place.

And honestly, the one rule I always come back to is — frontend authorization is really just UX, it’s not security. Like, say I hide the delete button on a post that isn’t mine. That’s fine, that’s nice, but it’s not actually protecting anything. If someone’s determined enough, they can just open dev tools, or fire off a request straight to the API themselves, completely skip my UI — and if my backend isn’t checking ‘hey, do you actually own this post?’ on its own, that delete just… goes through. Doesn’t matter that the button was hidden.

So yeah — I’d still hide the button, for sure, because it just makes the experience cleaner, users shouldn’t be staring at options they can’t use. But if you ask me where the real enforcement has to live, it’s a hundred percent the backend. Every single time. The frontend can be as locked-down as it wants visually, but it’s never the thing actually stopping a bad request.”


4. Common Beginner Mistake

Mistake: Thinking “The frontend checks if the user is logged in, so our system is secure.”
Correction: Frontend checks are for UX display only. The backend MUST independently verify session identity and resource ownership on every single incoming HTTP request, or the entire system is vulnerable to bypass attacks.


❓ Phase 4 Complete & Next Steps

Phase 4 Summary: Masterclass on boundary separation, UX vs Security enforcement, and API authorization principles.
Next Phase: Phase 5: API Design & Data Contracts

Lesson 6: News Feed — Phase 6: Pagination & Infinite Scroll

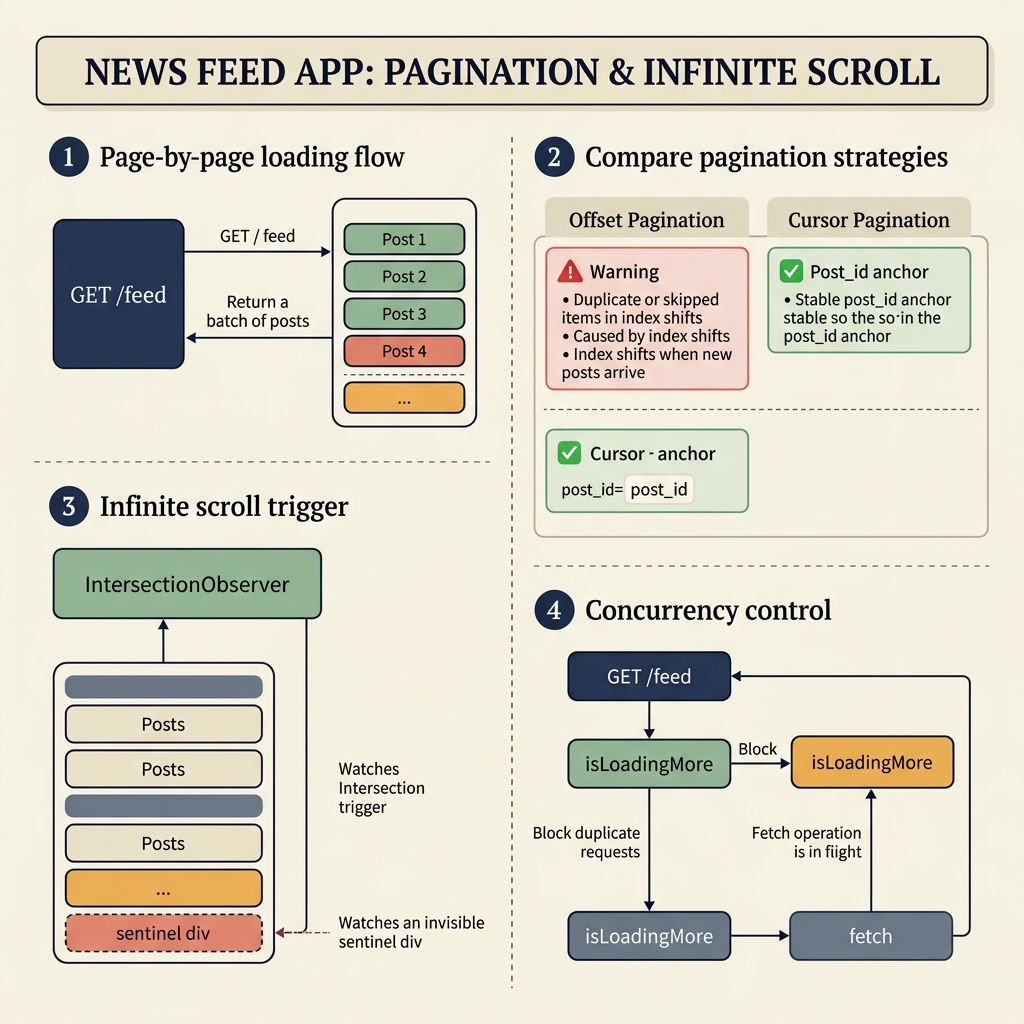
Pagination & Infinite Scroll Architecture


1. 🗣️ Interview Script — Pagination & Infinite Scroll

Practice speaking this exact script out loud during your System Design interview:

“Yeah, so I definitely wouldn’t send the entire feed in one response — that’s obviously not feasible at scale. I’d paginate it, so the backend sends back a fixed batch, say 10 or 20 posts at a time, and the frontend requests more as the user gets close to the bottom.

Now, for how I’d actually paginate — I’d lean towards cursor-based pagination over plain offset-based. With offset, you’re basically saying ‘give me posts 21 to 30,’ but the problem is, if new posts get added while the user’s scrolling — which, in a live feed, happens constantly — the whole list shifts underneath you, and you can end up seeing duplicate posts or skipping some entirely.

Cursor-based pagination avoids that, because instead of saying ‘give me page 3,’ you’re saying ‘give me the next batch after this specific post ID’ — so it stays stable even if new stuff gets inserted above.

On the frontend side, I’d detect when the user’s near the bottom of the feed — usually with something like an IntersectionObserver watching a sentinel element at the end of the list — and that triggers the next fetch. While that request is in flight, I’d show a loading spinner at the bottom, and once the new batch comes back, I’d just append it to the existing posts array in state.

One thing I’d be careful about is not firing duplicate requests if the user scrolls fast — so I’d track something like an isLoadingMore flag, and just ignore additional scroll triggers while a fetch is already in progress.”


2. Common Beginner Mistake

Mistake: Using page offsets (page=2 or offset=20) for dynamic news feeds, which causes duplicate or skipped posts when new content is published during scroll.
Correction: Always use immutable cursor-based pagination (cursor=post_id) paired with an IntersectionObserver sentinel trigger and an isLoadingMore concurrency lock to guarantee stable infinite scrolling.

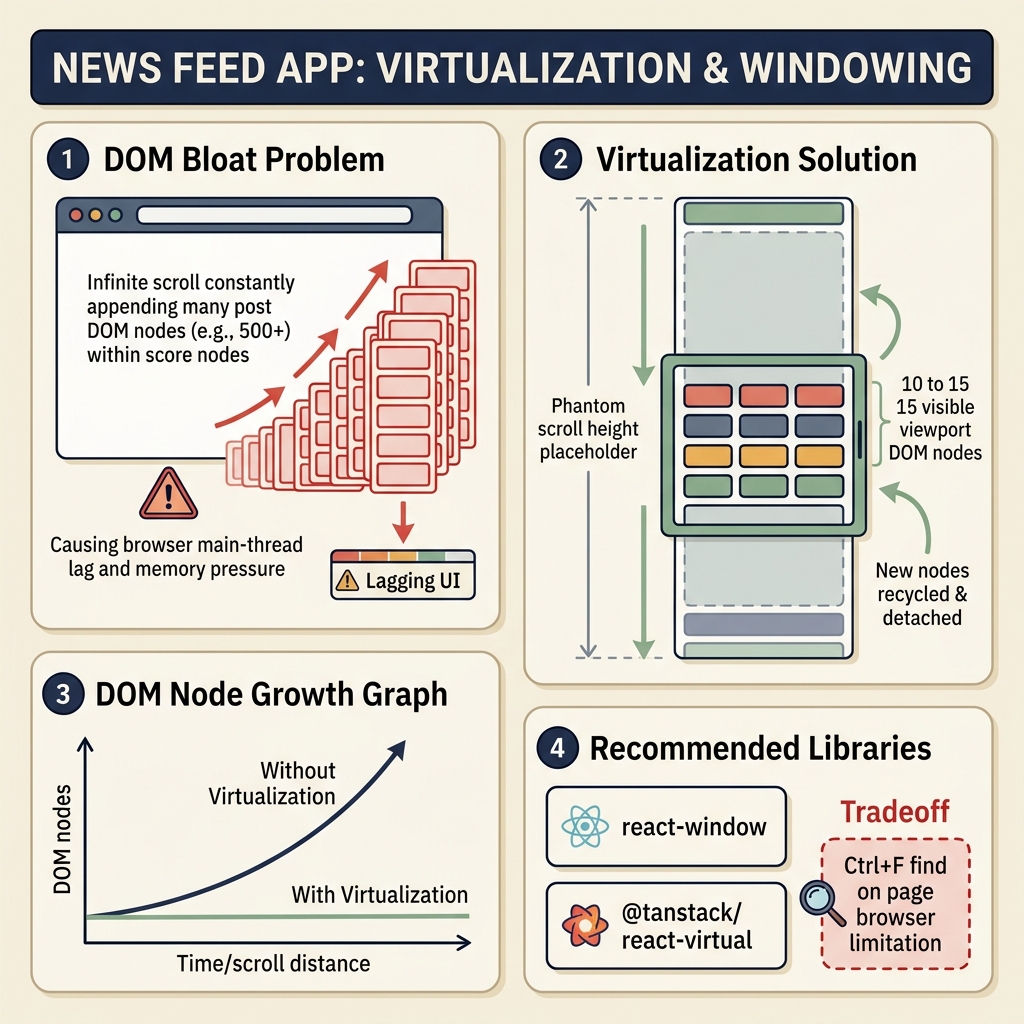
Lesson 7: News Feed — Phase 7: Virtualization

DOM Virtualization Architecture


1. 🗣️ Interview Script — Virtualization

Practice speaking this exact script out loud during your System Design interview:

“Yeah, this is actually a real problem with infinite scroll on its own — every time you load more posts, you’re just appending them to the DOM, and nothing ever removes the old ones. So after scrolling through a few hundred posts, the browser’s still holding onto all of them — all the images, all the event listeners — even though the user can only actually see, like, three or four posts on their screen at once. That starts to seriously hurt scroll performance and memory usage.

So on top of infinite scroll, I’d also use virtualization — sometimes called windowing. The idea is: only actually render the posts that are near the current viewport, and for everything else, just reserve the right amount of empty space so the scrollbar and scroll position still feel correct. As the user scrolls, posts that go far off-screen get removed from the DOM, and new ones get added in — so at any given moment, you’ve only got maybe 10 or 15 real DOM nodes for posts, no matter whether the user’s scrolled through 50 posts or 5,000.

In React, I wouldn’t hand-roll this myself — I’d reach for something like react-window or react-virtualized, or @tanstack/react-virtual, since getting the scroll math exactly right — especially with posts of different heights, like a text post versus an image post — is genuinely tricky to get right from scratch.

The one tradeoff I’d mention is that virtualization adds some complexity — things like browser find-on-page (Ctrl+F) won’t find text in posts that aren’t currently rendered, since they don’t actually exist in the DOM at that moment. So it’s a real tradeoff between performance and some of these edge-case behaviors, but for a feed with potentially thousands of items, it’s basically necessary.”


2. Common Beginner Mistake

Mistake: Assuming infinite scroll alone handles client performance, ignoring the exponential DOM memory growth that causes mobile browser tab crashes after 500+ posts.
Correction: Implement DOM virtualization (windowing) using established libraries (@tanstack/react-virtual or react-window) to maintain a flat, constant DOM node count (~10–15 nodes) regardless of total feed scroll distance.

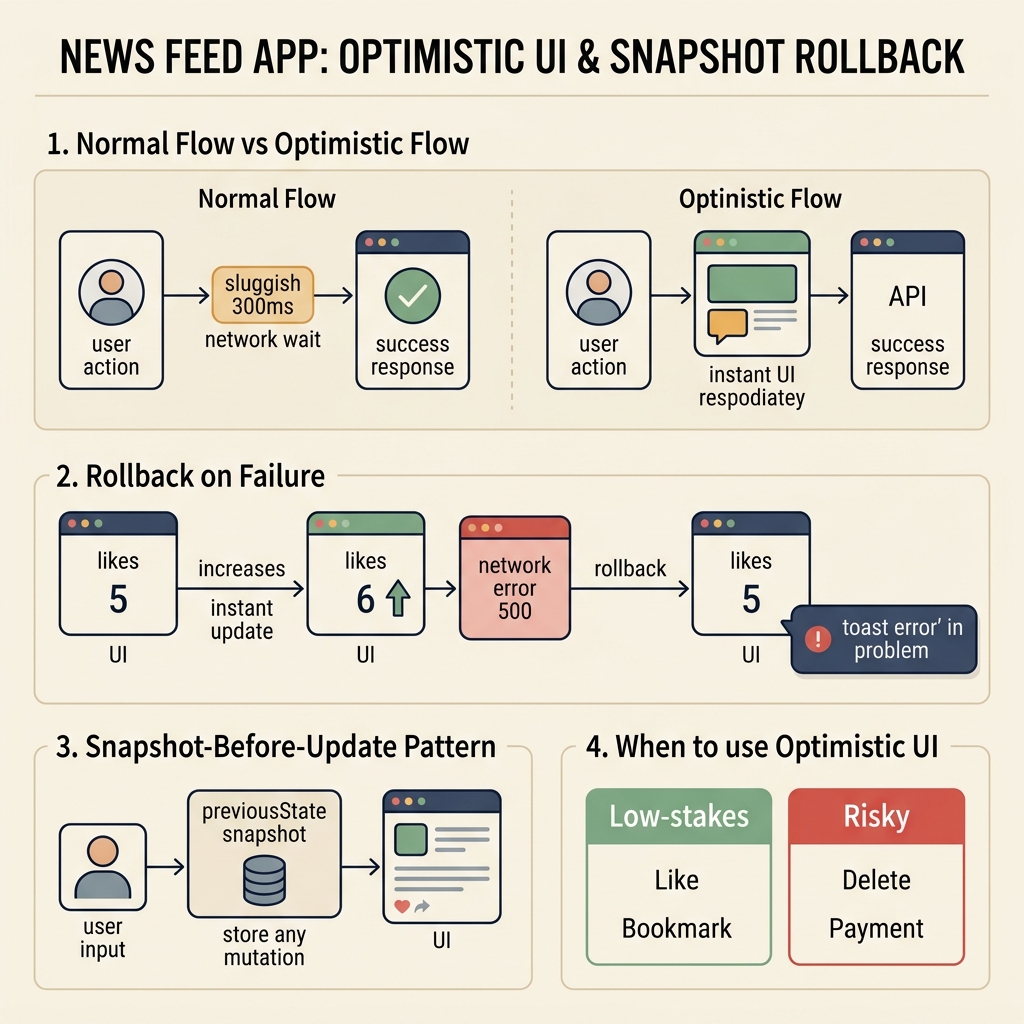
Lesson 8: News Feed — Phase 8: Optimistic UI

Optimistic UI Architecture


1. 🗣️ Interview Script — Optimistic UI

Practice speaking this exact script out loud during your System Design interview:

“So normally, if you wait for the server to confirm before updating the UI, there’s this awkward little delay — the user clicks like, and nothing visibly happens for a few hundred milliseconds, sometimes longer on a bad connection. That just feels broken, even though technically nothing’s wrong.

So instead, I’d use an optimistic update — meaning, the moment the user clicks like, I immediately update the local state to show it as liked and bump the count, before the server has even responded. The request still goes out in the background, but the user isn’t waiting on it visually.

Now, the important part is handling the failure case properly, because I’ve now shown the user something that hasn’t actually been confirmed by the server yet. So if that request comes back with an error — say the network dropped, or the server rejected it for some reason — I need to roll back the UI to what it was before, so it goes back to unliked, and probably show a small error, like a toast saying something went wrong.

One thing I’d be careful about is making sure I’m storing the previous state before I optimistically update, so the rollback is accurate — I don’t want to just guess what it was before, I want to snapshot it. And also, this pattern makes way more sense for something low-stakes and reversible like a like button, versus something like, say, deleting a post — for higher-stakes actions I might actually prefer to wait for confirmation, since a wrong optimistic update there is more disruptive to undo.”


2. Common Beginner Mistake

Mistake: Applying optimistic updates to high-stakes irreversible operations (e.g. deleting a post or initiating a payment) or guessing previous state during rollback.
Correction: Limit optimistic UI to low-stakes, easily reversible interactions (likes, bookmarks, follows). Always snapshot exact prior state (previousState) before mutating UI to ensure 100% accurate rollback when network requests fail.

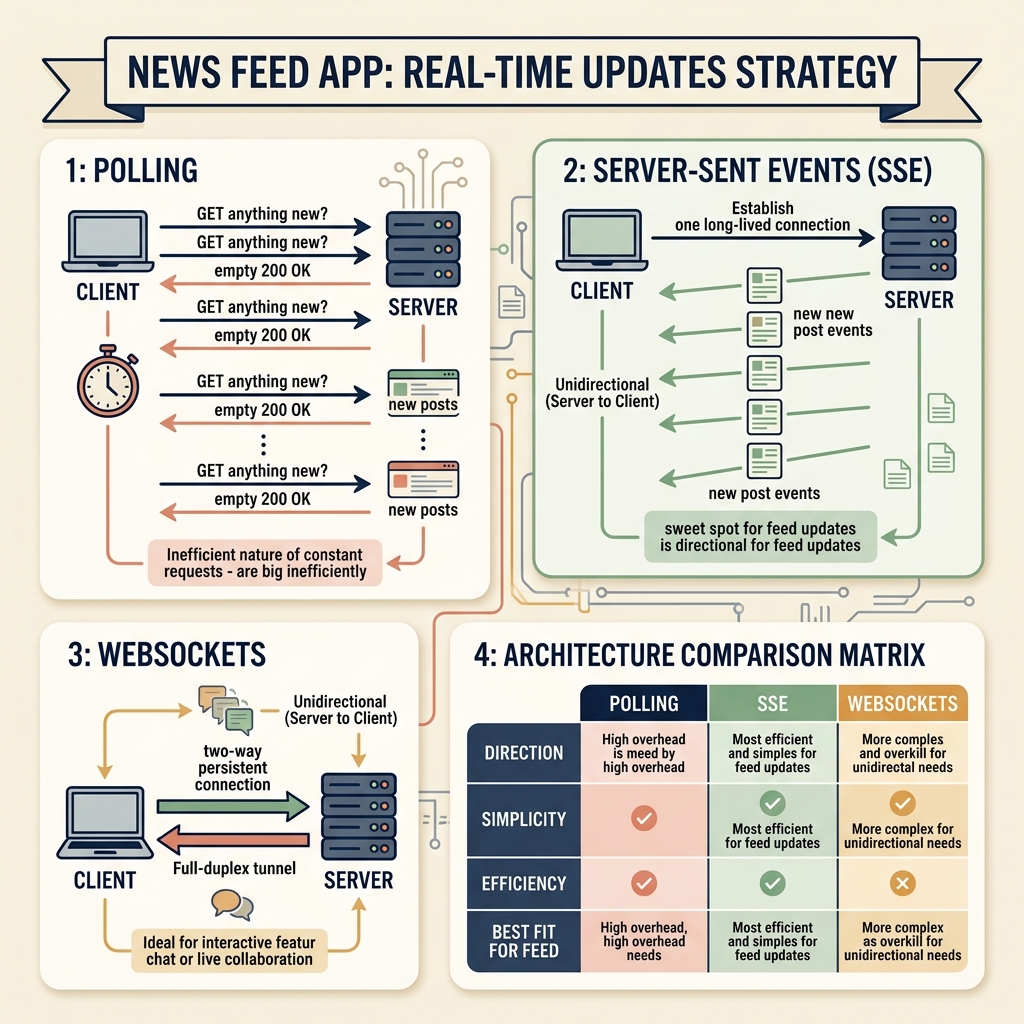
Lesson 9: News Feed — Phase 9: Real-Time Updates

Real-Time Updates Architecture


1. 🗣️ Interview Script — Real-Time Updates

Practice speaking this exact script out loud during your System Design interview:

“So there are really three options here, and I’d think through them based on how much real-time-ness we actually need.

The simplest option is polling — the frontend just asks the backend ‘anything new?’ every few seconds on a timer. It’s dead simple to build, but it’s wasteful, because most of those requests come back with nothing new, and at scale that’s a lot of unnecessary load on the server.

Then there’s Server-Sent Events, or SSE — instead of repeatedly asking, the frontend opens one persistent connection, and the backend just pushes a message down that connection whenever something actually happens, like a new post. It’s one-way, server to client only, but for a feed, that’s actually all we need — we’re not really sending real-time data back to the server from the feed screen itself.

And then there’s WebSockets, which is like SSE but two-way — both sides can send messages anytime. That’s great for something like a chat app, or live collaborative editing, but for a news feed specifically, it’s honestly more than we need, since the client isn’t pushing real-time data back.

So for this specific case, I’d go with SSE — it avoids the wasted requests of polling, and it’s simpler to reason about than a full two-way WebSocket connection, since a feed’s real-time needs are basically one-directional.”


2. Common Beginner Mistake

Mistake: Over-engineering news feed real-time streaming with full-duplex WebSockets or degrading server capacity with high-frequency short polling.
Correction: Select Server-Sent Events (SSE) as the optimal sweet spot for news feeds. SSE delivers lightweight, unidirectional server-to-client streaming over standard HTTP without WebSocket handshake/reconnection complexity.

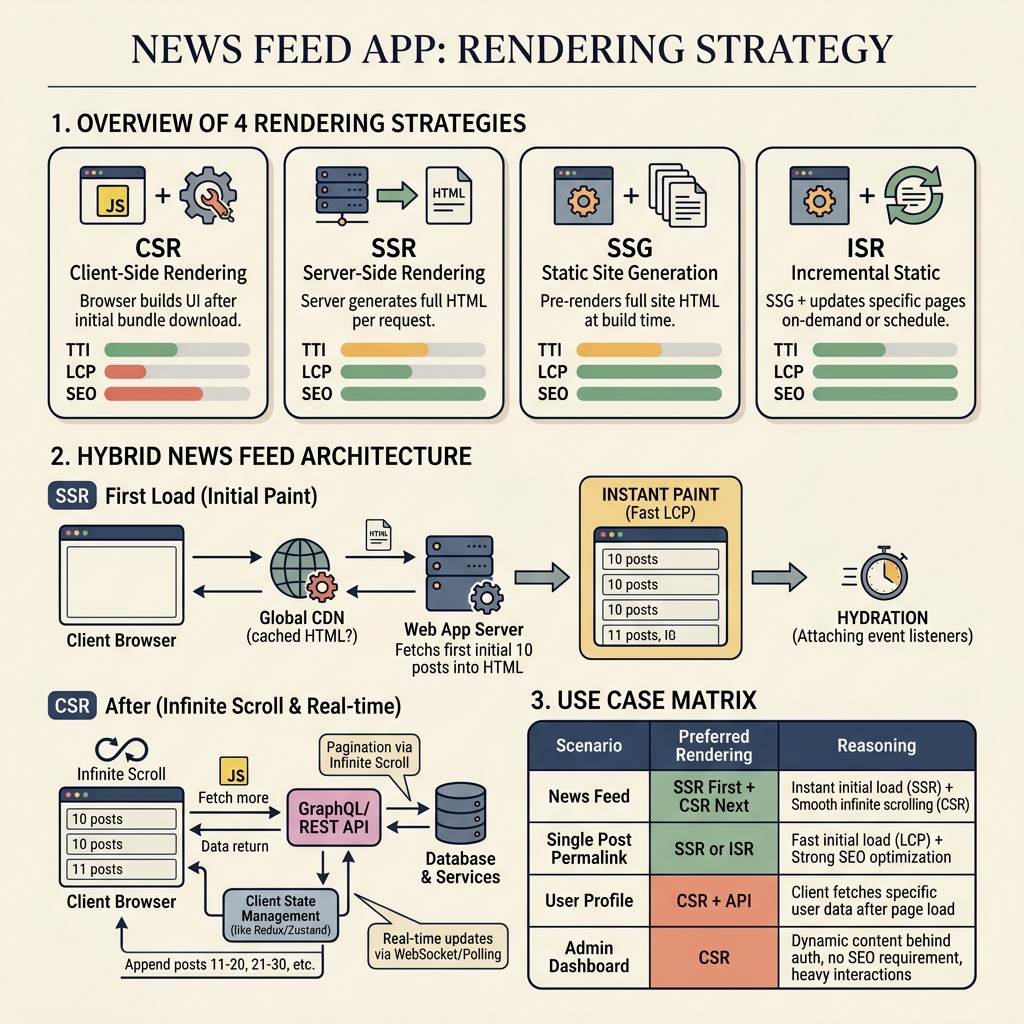
Lesson 10: News Feed — Phase 10: Rendering Strategy

Rendering Strategy Architecture


1. 🗣️ Interview Script — Rendering Strategy

Practice speaking this exact script out loud during your System Design interview:

“For the main feed screen, I wouldn’t go with a single strategy the whole way through — I’d actually mix two of them.

For the very first load, I’d want the server to render the initial batch of posts — say the first 10 — into real HTML and send that down, so the user sees actual content almost instantly instead of staring at a blank page with a spinner. That’s server-side rendering. After that HTML arrives, the JS loads and hydrates the page, making everything interactive.

But after that first load, I wouldn’t keep using SSR for everything — like when the user scrolls down and needs more posts, that’s just a normal client-side fetch, the same pagination flow we talked about earlier. There’s no reason to ask the server to rebuild a whole HTML page just to append 10 more posts — that’d be way more expensive than it needs to be. So from that point on, it’s basically client-side rendering taking over.

As for static generation or ISR — those don’t really fit the main feed, since the content is different for every single user and changes constantly. Where I would use something like SSR or ISR is on a single post’s permalink page, like when you open one specific post directly — that content’s more public, doesn’t vary per viewer as much, and benefits from being indexable by search engines.”


2. Common Beginner Mistake

Mistake: Using pure CSR for initial page load (forcing blank loading spinners) or attempting to use static site generation (SSG/ISR) for highly personalized real-time activity feeds.
Correction: Implement a Hybrid Rendering Strategy: SSR on the initial page request (serving the first 10 posts pre-rendered for instant Largest Contentful Paint), then hand off control to CSR for infinite scroll pagination, optimistic UI updates, and real-time SSE streams.

Lesson 5: News Feed — Phase 5: API Design & Data Contracts

API Design & Data Contracts Architecture


1. The Data Contract Principle

   Frontend code assumes:              Backend one day changes to:
   ------------------------            ---------------------------
   likes: number                       "likes": "five"   <-- string!
   post.likes + 1  -> works fine       post.likes + 1  -> BREAKS ("five1" or NaN)

🔑 “A Data Contract is a promise about field names and data types that BOTH sides rely on. Changing it silently breaks the other side’s code.”

  • Field Name Stability: Changing "likes" to "like_count" without notice breaks frontend property access (post.likes evaluates to undefined).
  • Type Safety: Changing a number to a string breaks math, sorting, and comparison logic.

2. 🗣️ Interview Script — API Design & Data Contracts

Practice speaking this exact script out loud during your System Design interview:

“So, at a basic level, I’d have the frontend hit something like GET /feed, and the backend responds with a list of posts — each post having stuff like an id, the author, the text or image, and the likes count.

The thing I actually care most about here isn’t really the URL itself, it’s more about agreeing on the shape of that response upfront — what fields exist, what type each one is. I’d think of it like a contract between frontend and backend — if the frontend expects likes to always be a number, and one day the backend sends it as a string instead, that’s going to break something on my end, maybe silently. So getting that contract nailed down early, and not changing it without both sides knowing, really matters.

I’d also try to keep the response lean — only sending what the UI actually needs to render the feed. So, I wouldn’t want the backend dumping the user’s entire profile object with fifty fields just to show their name and avatar next to a post — that’s wasted bandwidth, especially on mobile. I’d rather have a trimmed-down author object with just id, name, and avatar URL.

And on the flip side, I’d make sure it’s not too lean either — like, if I need comment count on the feed screen, I want that included in the initial response, rather than firing off a separate request per post just to get comment counts. That would be a classic case of under-fetching, and it’d tank performance with a feed full of posts.

So basically, my approach is: define the exact shape of the request and response upfront, treat it like a contract both sides commit to, and keep the payload as close as possible to exactly what the UI needs — not more, not less.”


3. Common Beginner Mistake

Mistake: Designing backend APIs based on database tables rather than UI screen requirements.
Correction: APIs serving frontend UI (BFF - Backend For Frontend pattern) should deliver aggregated, clean, and screen-tailored JSON payloads so the client can render the UI in a single round-trip.

Lesson 11: News Feed — Phase 11: Performance Optimization

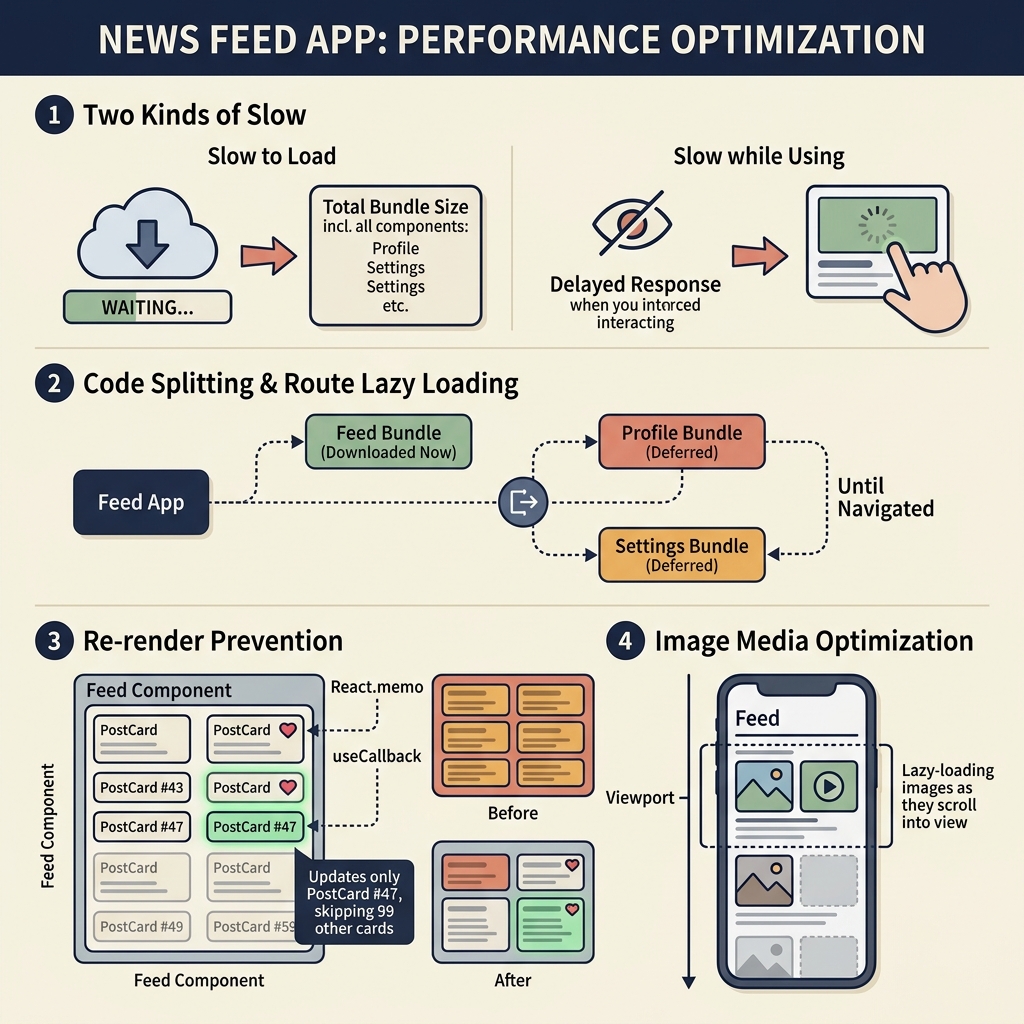
Performance Optimization Architecture


1. 🗣️ Interview Script — Performance Optimization

Practice speaking this exact script out loud during your System Design interview:

“There’s kind of two different performance problems here — how fast the app loads initially, and how smooth it feels once you’re actually using it.

For the initial load, I’d use code splitting, so the user isn’t downloading JS for pages they haven’t even visited yet — like, if they’re just looking at the feed, they shouldn’t be paying the download cost for the settings page or the chat feature. That code only loads later, when they actually navigate there.

For how it feels while scrolling and interacting, the big thing is avoiding unnecessary re-renders. So say a user likes one post out of a hundred visible on screen — I don’t want the entire list re-rendering because of that, I only want that one PostCard to update. I’d lean on things like React.memo to skip re-rendering components whose props haven’t actually changed, and be careful with things like useCallback so I’m not accidentally creating new function references every render that would defeat that memoization.

And then for images specifically, since a feed is pretty image-heavy, I’d lazy-load them — only actually load an image once it’s about to scroll into view, rather than loading every single image in the feed upfront, which would waste a lot of bandwidth and slow down that initial paint.”


2. Common Beginner Mistake

Mistake: Bundling the entire application into a single giant JavaScript file or recreating inline callback props on every render, causing all 100 visible post items to re-render when a single like button is clicked.
Correction: Implement route-level code splitting (React.lazy), wrap list items in React.memo with stable useCallback handler props, and defer off-screen images with native <img loading="lazy"> to achieve silky 60fps scrolling and rapid initial paint.

Lesson 12: News Feed — Phase 12: Client Caching & Invalidation

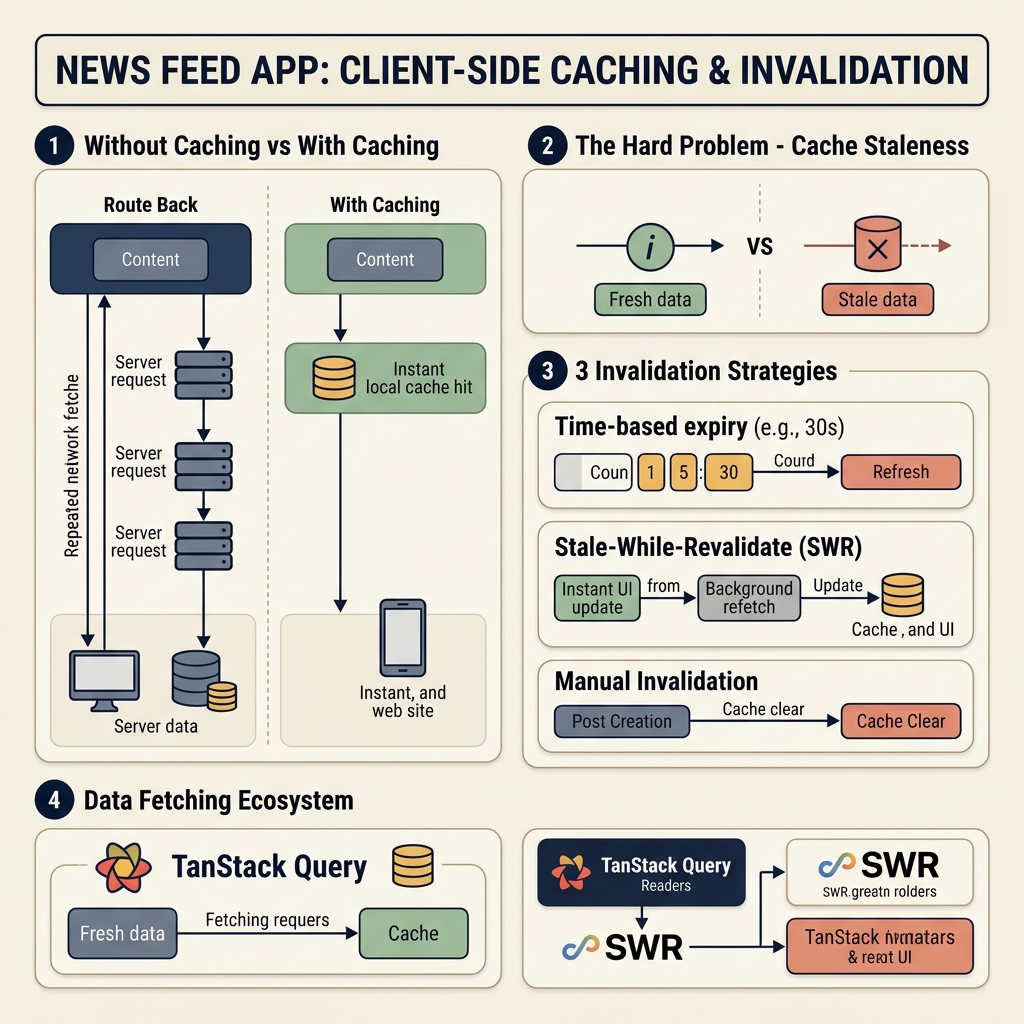
Client Caching & Invalidation Architecture


1. 🗣️ Interview Script — Client Caching

Practice speaking this exact script out loud during your System Design interview:

“I wouldn’t want to refetch the entire feed every single time the user navigates back to it — if they were just on the feed 5 seconds ago, went to their profile, and came right back, refetching everything again is wasteful, both for speed and for server load. So I’d cache the fetched posts locally.

The tricky part with caching isn’t really storing the data, it’s knowing when to treat it as stale. I’d probably lean towards a stale-while-revalidate approach — show the cached data immediately so it feels instant, but quietly refetch in the background at the same time, and update the UI if anything actually changed. That way the user isn’t staring at a spinner, but the data also doesn’t stay wrong forever.

But there are also cases where I don’t want to wait for any staleness timer at all — like if the user just created a new post themselves, I know for a fact the cached feed is now outdated, so I’d actively invalidate it right then rather than waiting for it to expire naturally.

In practice, I probably wouldn’t hand-roll all of this myself — I’d reach for something like React Query or SWR, since they already handle caching, background revalidation, and invalidation in a pretty battle-tested way.”


2. Common Beginner Mistake

Mistake: Forcing fresh network round-trips every time a user navigates back to the feed tab, or allowing stale cached feeds to persist after a user publishes a new post.
Correction: Adopt a Stale-While-Revalidate (SWR) caching pattern paired with active manual cache invalidation (queryClient.invalidateQueries(['feed'])) on post creation actions using industry-standard tools like @tanstack/react-query or swr.

Lesson 13: News Feed — Phase 13: Failure Handling & Reliability

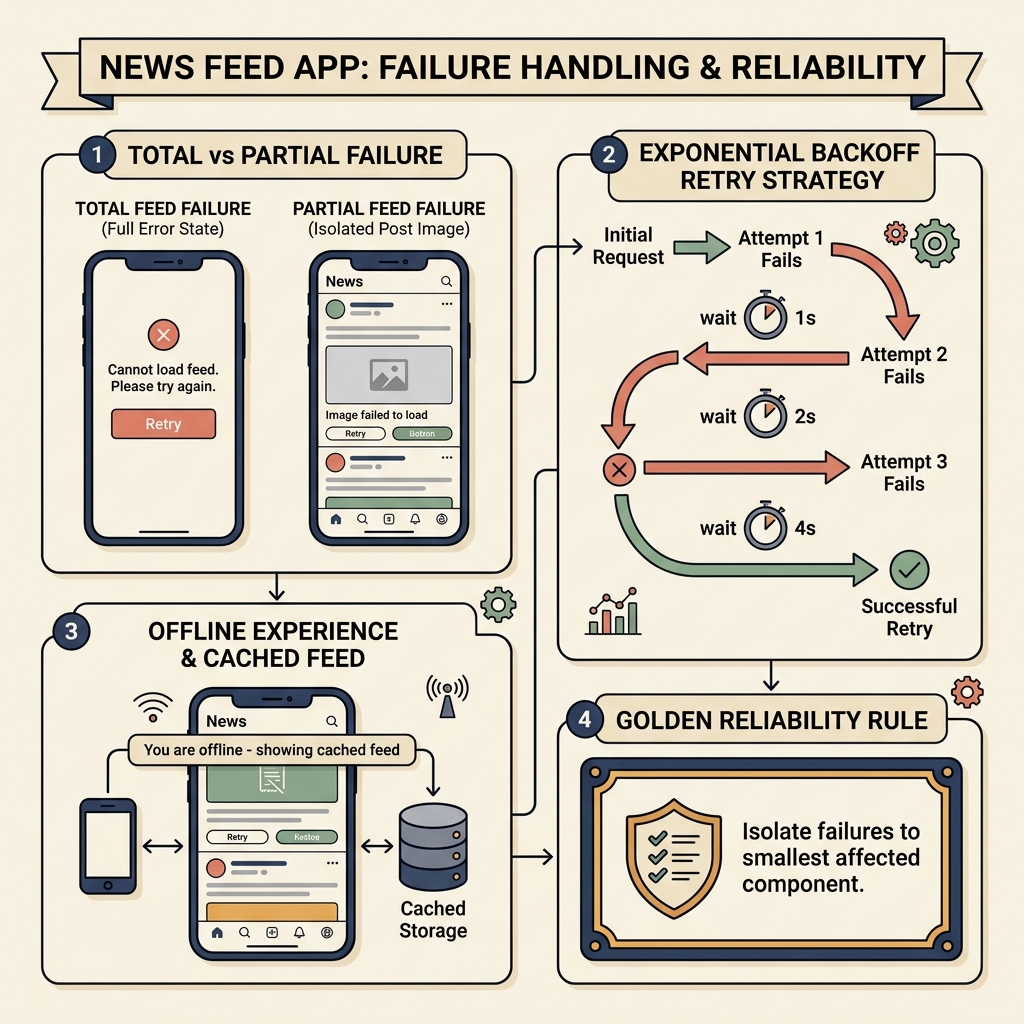
Failure Handling & Reliability Architecture


1. 🗣️ Interview Script — Failure Handling & Reliability

Practice speaking this exact script out loud during your System Design interview:

“I’d think about failures at a couple different levels, because not every failure should be treated the same way.

If the entire feed fails to load — say the initial request totally fails — I’d show a clear error state with a retry button, rather than just leaving a blank screen or crashing the page. And I wouldn’t necessarily give up after just one failed attempt either — I’d retry automatically a few times first, with increasing delay between each attempt, so I’m not hammering a struggling server with retries back to back. If it still fails after that, then I’d surface the error to the user.

But then there’s partial failure, which I think is actually more common in practice — like, the feed loads fine, but one image inside one post fails to load. In that case, I definitely wouldn’t want that to break the whole page. I’d just show a broken-image fallback for that one spot, and every other post keeps working normally. The general principle I’m following is: isolate failures to the smallest piece possible, don’t let one broken thing take down the whole experience.

I’d also handle going offline explicitly — if the browser tells me the user’s lost connection, I’d show a subtle banner saying something like ‘you’re offline, showing cached posts,’ but I wouldn’t blank the screen — they can still scroll through whatever’s already loaded, and once they’re back online, I’d quietly resume or refetch in the background.

And for something like liking a post specifically, if that optimistic update fails, I’d just roll back that one action and show a small, non-blocking error — not something that interrupts or breaks the rest of the feed.”


2. Common Beginner Mistake

Mistake: Allowing a single component error (like a corrupted post image) to crash the entire application, or bombarding struggling backend servers with instant unthrottled retries.
Correction: Isolate component failures with UI error boundaries/fallbacks, enforce Exponential Backoff retry logic (1s → 2s → 4s), and maintain offline usability by presenting cached content with non-intrusive status banners.

Lesson 14: News Feed — Phase 14: Tradeoffs & Defense (Final Phase)

Architectural Tradeoffs & Defense


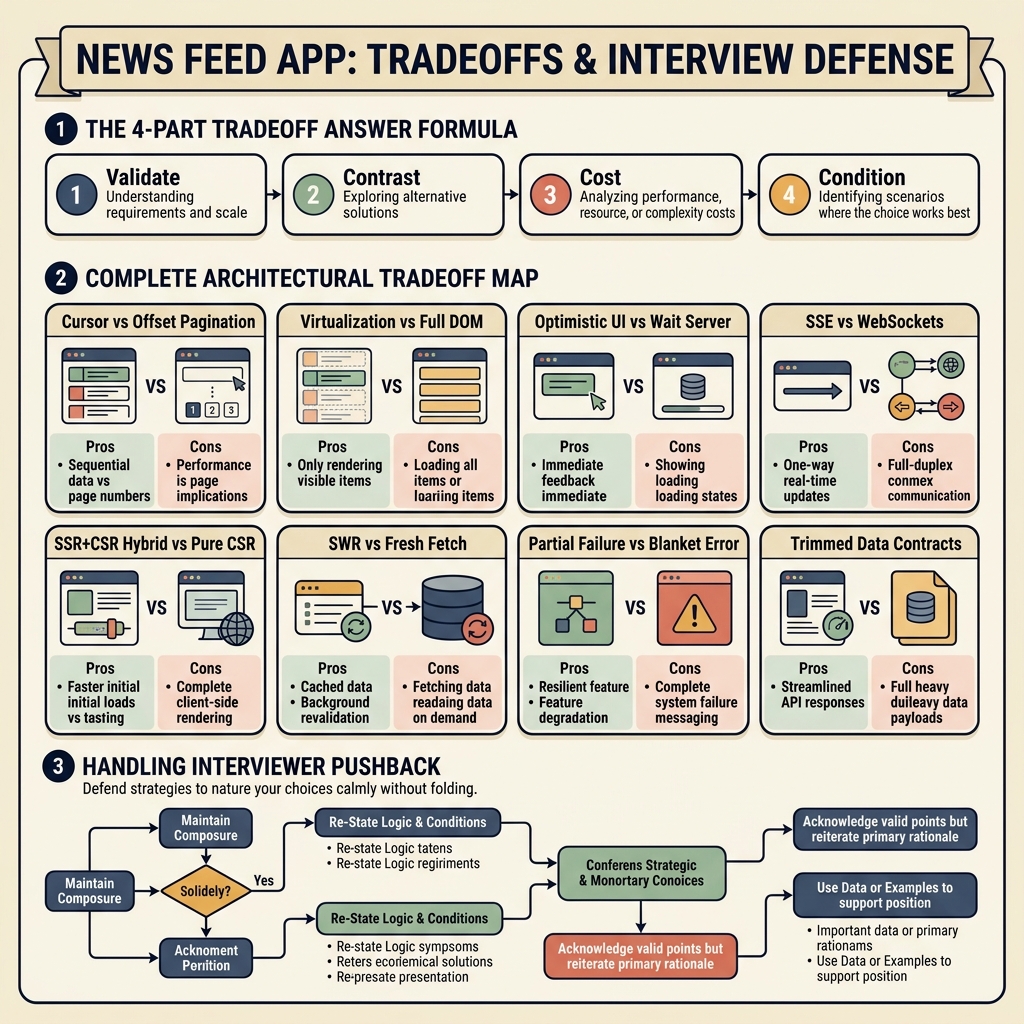
1. The 4-Part Tradeoff Answer Formula

In a System Design interview, stating “I chose X” sounds like memorization. Senior engineers articulate CHOICE → REASON → COST → CONDITION:

  1. VALIDATE: Acknowledge that the alternative option is valid (“Option Y is a reasonable choice…”).
  2. CONTRAST: State why your choice fits this specific problem (“…but for a high-velocity news feed, I chose X because…”).
  3. COST: Explicitly name what you gave up (“…the tradeoff is accepting higher complexity in Z…”).
  4. CONDITION: Define the exact condition where you would switch (“…if requirements changed to require two-way live chat, I would switch to Y.”).

2. Full Architectural Tradeoff Map (Phases 1–13)

DecisionChoseOverPrimary ReasonAccepted Tradeoff (Cost)
PaginationCursor-BasedOffset-BasedPrevents duplicate/skipped items when new posts arriveSlightly higher implementation complexity
Long List RenderingVirtualizationPermanent DOMPrevents exponential DOM bloat and tab memory crashesBreaks browser Ctrl+F text search on off-screen items
Like ResponsivenessOptimistic UIWait for ServerInstant UX feedback on high-frequency interactionRequires snapshot rollback logic on 500 error
Real-Time StreamServer-Sent Events (SSE)WebSockets / PollingFeed updates are strictly unidirectional (server → client)Cannot send client data back over same connection
Rendering StrategySSR First + CSR NextPure CSR / Pure SSRInstant initial paint (fast LCP) + smooth infinite scrollRequires server rendering infrastructure + hydration
Data FreshnessStale-While-RevalidateAlways Refetch / Pure CacheInstant cache display with automatic background updatesUser may briefly view slightly outdated posts
Failure IsolationComponent BoundariesBlanket Error PageBroken post image doesn’t crash remaining 99 postsRequires granular per-component error boundaries
Data ContractsTrimmed PayloadRaw DB ObjectsMinimizes network RTT & mobile bandwidth wasteRequires maintaining tailored BFF API schemas

3. Common Pushback Questions & Model Answers

Q1: “Why not use offset pagination? It’s simpler.”

“It is simpler, and for a static list I’d use it. But a news feed has posts inserted constantly while users scroll, causing index shifting that yields duplicate or skipped posts. Cursor pagination anchors to an immutable post ID, so I accept the minor tracking complexity for data correctness.”

Q2: “Why not skip virtualization to reduce complexity?”

“For short lists, I would skip it. But a feed session can load hundreds of posts; without virtualization, DOM memory growth tanks scroll performance. The performance gain outweighs implementation cost, and in practice, I’d use @tanstack/react-virtual.”

Q3: “Why not wait for server confirmation before showing a like?”

“Waiting is safer regarding state truth. But liking is a high-frequency, low-stakes action where a 300ms delay feels sluggish. The immediate UX win outweighs the small risk of an error rollback, which is straightforward to handle with a snapshot.”

Q4: “Why SSR at all? Why not pure CSR everywhere?”

“Pure CSR is simpler, but causes blank loading spinners that harm perceived speed and SEO. SSR for just the initial 10 posts delivers instant HTML rendering, after which CSR takes over for scrolling without paying SSR costs on every API request.”

Q5: “Isn’t Stale-While-Revalidate risky for data accuracy?”

“There is a brief window where displayed data may be slightly stale. However, background revalidation self-corrects it in seconds. Blocking on fresh network calls makes every navigation feel slow, which is a worse tradeoff for activity feeds.”


4. 🗣️ Interview Script — Tradeoffs & Defense

Practice speaking this exact script out loud during your System Design interview:

“Interviewer: ‘Why did you choose cursor-based pagination instead of offset-based?’

Candidate: ‘Offset pagination is definitely simpler — you’re just saying ‘give me page 3’ — and for a list that doesn’t change much, I might actually go with that. But a news feed has new posts coming in constantly while people are actively scrolling, and with offset pagination, the whole list shifts underneath you when that happens — so you can end up seeing duplicate posts, or missing some entirely.

Cursor pagination avoids that because it’s anchored to a specific post ID rather than a numeric position, so it stays stable even as new content gets inserted above. The tradeoff is it’s a bit more complex to set up — you’re tracking and passing a cursor value instead of just a page number — but for a feed specifically, I think that’s worth it.’”


5. Common Beginner Mistake

Mistake: Folding immediately when challenged (“Oh, you’re right, maybe WebSockets would be better…”) or failing to state the explicit cost of chosen patterns.
Correction: Defend your architecture using the 4-part formula: validate the alternative, explain why your choice fits this specific problem, explicitly name the accepted tradeoff, and define the exact boundary condition where you would switch.

Lesson 15: News Feed — How to Draw & Explain System Architecture Live in an Interview

Interview Whiteboard Architecture Diagram


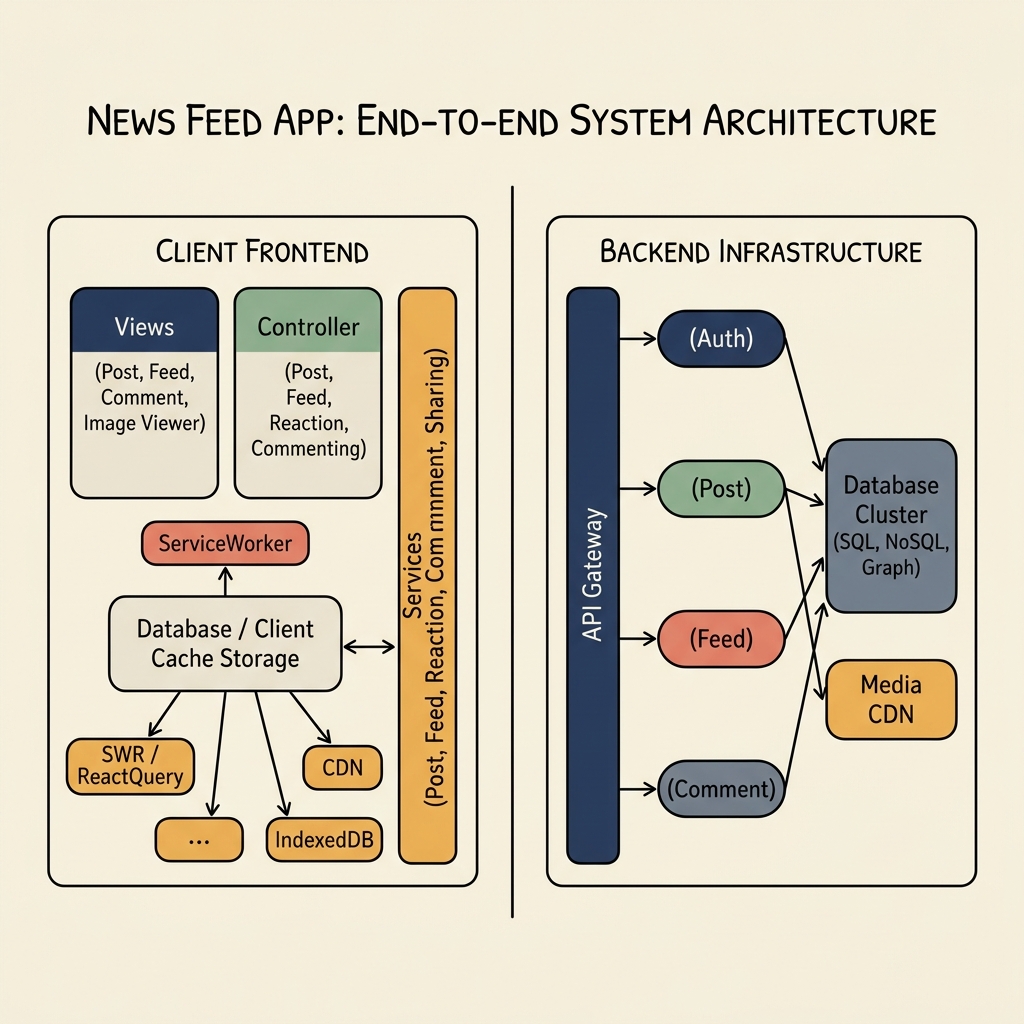
1. The 60-Second Whiteboard Drawing Order (4-Step Blueprint)

When asked to draw the system architecture on a whiteboard, do NOT start drawing random arrows or 50 microservices. Follow this clean 4-column layout (C → G → S → D):

+-------------------+     +-------------+     +--------------------+     +-------------------+
|   1. CLIENT APP   |     | 2. API      |     | 3. SERVICES        |     | 4. STORAGE & CDN  |
|   (Left Box)      | --> |    GATEWAY  | --> |    (Right Top)     | --> |    (Right Bottom) |
| Views | Cache | DB|     | (Center)    |     | Feed | Post | Auth |     | Postgres|Redis|CDN|
+-------------------+     +-------------+     +--------------------+     +-------------------+

Step 1: Draw the Client Container (Left Column)

  • Draw a large rectangle for the Client App.
  • Inside, divide into 3 horizontal blocks:
    1. Views: FeedList, PostCard, Composer
    2. Cache Layer: React Query / SWR (Stale-While-Revalidate)
    3. Local DB: IndexedDB / LocalStorage

Step 2: Draw the API Gateway (Middle Column)

  • Draw a tall narrow pill shape labeled API Gateway.
  • Label its 3 core duties: Authentication, Rate Limiting, REST / SSE Router.

Step 3: Draw Backend Services (Right-Top Column)

  • Draw 2 main service boxes:
    1. Feed Service: Generates & orders personalized news feed arrays.
    2. Post & Reaction Service: Handles post creation, likes, and comments.

Step 4: Draw Storage & CDN (Right-Bottom Column)

  • Draw 3 storage boxes:
    1. Primary DB: PostgreSQL / MySQL (relational truth for posts & users)
    2. Cache Store: Redis (hot timeline feeds & fast counter lookups)
    3. Media CDN: Cloudflare / CloudFront (image/video asset distribution)

2. 🗣️ Word-for-Word Interview Pitch Script (Speak While Drawing)

Practice speaking this exact script out loud as you draw each box on the board:

“Sure! Let me sketch out how I’d structure the end-to-end architecture for this News Feed.

(Draw Step 1 - Client Box)
‘Starting on the Client side, I’d break the frontend into clear layers. At the top, we have our UI Views — FeedList for infinite scrolling, PostCard for rendering items, and Composer for creating posts. Below that, I’d use a dedicated data-fetching layer like React Query or SWR to handle client caching, background revalidation, and optimistic state rollbacks. And for offline support, we can store cached posts in IndexedDB.’

(Draw Step 2 - Gateway Pill)
‘All client network requests go through a single API Gateway. This handles token authentication, rate limiting, and routes requests — sending feed fetches over standard REST/GraphQL, and establishing a persistent SSE (Server-Sent Events) connection for real-time new post notifications.’

(Draw Step 3 - Backend Services)
‘Behind the gateway, I’d decouple the backend into dedicated services. The Feed Service is responsible for computing and retrieving the user’s timeline using cursor-based pagination. The Post & Reaction Service handles creating posts and processing likes or comments.’

(Draw Step 4 - Storage & CDN)
‘For data storage, PostgreSQL serves as our relational source of truth for user profiles and posts. To keep feed reads ultra-fast, pre-computed user feed IDs are cached in Redis. And all heavy image and video media assets are served directly from a global Media CDN, so our core app servers never get bogged down serving static files.’


3. Whiteboard Memory Mnemonic: C-G-S-D

🧠 Remember the 4 Columns:
CClient (Views + React Query Cache + Local Storage)
GGateway (Auth + Rate Limiting + SSE Router)
SServices (Feed Generation + Post/Reaction Service)
DDatabases (Postgres + Redis Cache + Media CDN)


4. Common Beginner Mistake

Mistake: Drawing lines and arrows before drawing box containers, or cluttering the board with detailed code syntax rather than clean architectural boundaries.
Correction: Draw the 4 core column boundaries first (Client → Gateway → Services → Storage), label each box clearly in block letters, and draw directional arrows as you speak through the request flow.